In response to a question on my previous post Printer Drivers Unleashed I thought I’d write a small article on a way to scan successfully from the Xerox Workcentre 6015N onto a Linux box. As normal, using my trusty Asus UJ36 laptop under Ubuntu 12.04.
This is partially based on the user guide available at the official Xerox site, but there are a few unexplained things that may not be so obvious.
According to the guide, there are three ways to communicate with the scanner:
- Scanning to a shared computer folder. I attempted this but could not get it to work.
- Scanning to an email address. I did not try this as it is more of a last resort than the other methods. Well for me that is, others may have different applications where this is preferable.
- Scanning by ftp. This is the method I will be discussing here.
Firstly, we need ftp to be available on the computer. Due to experimentation with ssh, my computer was locked down and inaccessible to pretty well anything, including the scanner, so I used the Ubuntu instructions given here to enable ftp. I went as far as the section on setting up “user authenticated FTP configuration”. Briefly:
- install ftp: sudo apt-get install vsftpd
- edit /etc/vsftpd.conf to uncomment local_enable=YES and write_enable=YES
- restart ftp: sudo /etc/init.d/vsftpd restart
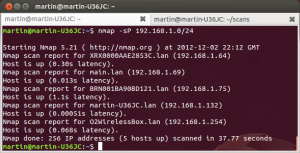
The next things needed are the IP addresses of the computer and the scanner. There are options on the scanner to find its IP address and many ways to find the local computer’s, but I find the nmap -sP 192.168.1.0/24 command very useful to see what addresses are used on my local network. It takes a while as it is polling the 256 addresses on the local subnet individually. This gives:
 Here we can see Xerox XRX0000AAE2853C.lan on 192.168.1.64 and the local computer, martin-U36JC.lan, on 192.168.1.132. As an aside, since we will hard code these values, it is useful to make the router use static IP addresses for them. In my case, this can be done by going to the router’s web page, given by the last IP address for the O2WirelessBox.lan at 192.168.1.254. Everyone’s is likely be different (well, unless yours isn’t of course), but mine allows this option to be set for each new item added to the network. I find if I don’t do this, the router reallocates and I have to delete and re-add printers and that sort of thing.
So let’s now check that ftp is working. Use the ftp 192.168.1.132 command (well, using your computer’s IP naturally) to get something like this, where you can use the pwd command to check where you are.
You can use Ctrl-D to escape ftp’s clutches.
When the scanner ftps to the computer, it will log in to my home directory and I would like to create a sub-directory to put the scans in. From the home directory I can use mkdir scans to create it. I set it’s access to public with chmod 777 scans, but I suspect this is not necessary due to the scanner logging in as me. I did this probably as a relic of trying to get the shared folder option to work.
Next we need to set up the scanner, so type in the IP address into a browser to get:
 Now, click on the address book and then the computer/server address book in the left hand panel to give:
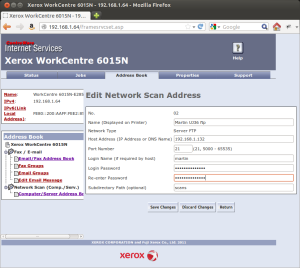
 As you can see here, I’ve added two entries. The first was for the failing shared drive attempt and the second for the successful ftp option. If you don’t have anything set up, click on Add, but I could click on the second entry’s name to give:
 On the add screen you can enter slightly more details, but the results are shown above. By the way, you can click on any of these images to get a higher res version. The values you should enter are:
- Name: This is the name that will be displayed on the Xerox’s lcd screen to identify this computer. You can set up many computers by this method, or have multiple sign ons for different people.
- Network Type: Choose Server FTP from the drop down list.
- Host address: this is the IP address of the computer. If it is not a static IP, you will have to occasionally change it here.
- Port Number: 21 worked fine for me.
- Login name: your login – as this is using ftp, your network is much less secure than when using nice things like ssh. I think the way forward here would be to set up a captive login ftp account for scanning purposes only. TBD.
- Password: the bane of the computer world.
- Subdirectory Path: the optional subdirectory/ies off the home directory that receives the scans.
Finally, once updated, everything should be ready to go. Put the document on the scanner, click the buttons (I can go through this if anyone really wants me to), select scanning options including the computer to ftp to and press the big green GO! GO! GO! button (ok, maybe it doesn’t say that and don’t confuse it with the little black GO! button). If things are not set up right, it scans but you get a connection error. Things to check for are the ftp configuration and the scan subdirectory being set up ok, but hopefully you should be able to get a fine result:
 Yes, erm, no cropping, default settings. The content was the first thing that came to hand on my cluttered desk. Got at an event a while ago, no I don’t subscribe …

