
On my desktop computer, I am able to control the fans under Windows using software provided by the motherboard manufacturer, but it is not obvious how to do this under Ubuntu. There are various articles around on the internet, but this has been a constant problem for me so I thought I’d collect together all the info I need to provide a reference for the future.
Maybe this has arisen because my desktop PC hardware is 4 years old and newer motherboards are better integrated with modern Linux, but this is what I needed to do to solve this problem.
Caveat – if you’re not comfortable running your PC without fans for a time, don’t bother going any further. I don’t think this is particularly dangerous, but some might. When I first bought this computer, the manufacturer hadn’t attached the CPU cooler correctly and I ran for a while with the cores permanently throttling themselves at 100 degrees. The values shown below are after correcting this and replacing all the fans with high-end quiet versions (except the power supply).
Install the software
sudo apt-get install lm-sensors xsensors fancontrol
As a check to monitor fan speeds, cpu and motherboard temperatures, we first need to be able to run xsensors. Let’s detect some:
sudo sensors-detect
This identifies the kernel modules that can monitor the speed of the fans and the temperature of the cpu, motherboard etc. I answered yes to every question including the one where it does the update to the kernel configuration file. You can see the additions in /etc/modules. Here coretemp shows the cpu temperatures and w83667hg shows motherboard information such as fan speeds, temperatures and voltages.


If you run the command twice, it will put the drivers into /etc/modules twice.
To use the kernel modules, I ran:
sudo service kmod startHere are some links to more information:
https://wiki.archlinux.org/index.php/lm_sensors
https://help.ubuntu.com/community/SensorInstallHowto
Then you can run sensors on the command line:

or xsensors to get this in a dynamically updating window:

Enable Fan Setup Configuration
This is where we get the first error that may not be obvious how to fix. What we are trying to do is to automatically have the fan speeds controlled by a sensor temperature. This can be set up using pwmconfig. When I first ran it, I got the error:
/usr/sbin/pwmconfig: There are no pwm-capable sensor modules installed
This can be fixed by relaxing an acpi check in the kernel (hmm), see https://hydra.geht.net/tino/howto/linux/fixes/w83627hf/ amongst others for more details. The way I fixed this is to edit /etc/default/grub to add acpi_enforce_resources=lax to the GRUB_CMDLINE_LINUX_DEFAULT giving:
GRUB_CMDLINE_LINUX_DEFAULT="quiet splash acpi_enforce_resources=lax"
Then need to update the boot configuration:
sudo update-grub
and reboot.
Fan Setup Configuration
Then I could run pwmconfig:
 I think it’s worth taking a moment to understand the concepts that are being shown here. These all refer to sub-directories of /sys/class/hwmon. In standard Linux fashion, these directories contain files that can be read or written to control the physical devices we are interested in:
- Devices – these are the bits of hardware that can have monitoring capabilities – as shown earlier, coretemp = cpu, w83667hg = motherboard and radeon = video card.
- PWM controls – these are the devices that can control fan speeds using pwm. Pwmconfig will cycle through each one and see if any of the fans has had their speed changed. For those that don’t know, pulse width modulation (PWM) is a way to use a digital output to control an analogue device. 255 represents fully on (power rail value e.g. 5v), 0 represents ground (e.g 0v). For an intermediary value, it represents the percentage of time that the high value will be on the output – so 150 would mean (150/255) * 100 = 59% of the time. The speed of update of the pulse is much faster than the analogue device can handle so it treats it like a lower voltage – in this example it would effectively be 5v * 59% = 2.9v.
- Fan sensors – these devices can be read to give the current fan speed.
For example, on my computer I can read all the fan speeds and then set most of them using one of the pwm controls (must be root to do the setting):
 These values should also be shown dynamically in xsensors if you have it running.
Using this ability, you can find out which fans your pwm devices are able to control. In my situation, I can see that only pwm2 controls any fans, and they are fans 1, 4 and 5. Fan 2 has no ability to be controlled. Pwm1 and pwm3 do nothing. I have 3 case fans and 1 cpu fan, maybe if I figure out which fan is not able to be controlled, and then connect it to the unused fan3 control, I could control that with pwm2 as well?
Pwmconfig does this analysis in a more rigorous way, but I found it easier to do this myself to really understand what was going on. This also allows you to figure out good values to use. So, back to pwmconfig. Breaking the suspense, it recomments using gnuplot to plot correlations between pwm control values and fan speeds – this didn’t work for me. Instead I had to fall back on the terminal output.
While this is happening, it’s also important to listen to how loud the fans are. In my case, the reason for doing this configuration is to reduce the noise made by the fans. I don’t need to actually stop them, I just need to set the minimum speed to a value where the fans make as least noise as possible, while providing the maximum cooling at that noise level.
When pwmconfig asks if you want to do a detailed correlation, let it. Here is a section of the output for me:
 This manipulates each pwm control and then checks through the fan speeds to see if any have been affected. Here, pwm1 and pwm3 are recognised as having no function and pwm2 is identified as controlling fans 1, 4 and 5. Using the detailed correlation and acoustic monitoring, I found that as soon as the pwm value descends from 255, the fans slow and the volume starts to decrease. When it reaches 150, I can no longer hear any change in volume as the uncontrollable fan 2 becomes dominant. Possibly if it wasn’t there, I could go further.
Then we can proceed within the pwmconfig script to setting up a fancontrol config file. On the next menu, I selected 1) hwmon1/device/pwm2 to configure. As the settings will be temperature controlled, we need to choose a particular temperature sensor to be the driver. We are presented with a list of all sensors on each device:
 I get the highest temperature readings from the cpu (core 2), so I would like that to determine how I set my fans. This corresponds to item 3 in the menu. Here is how I set up the values:
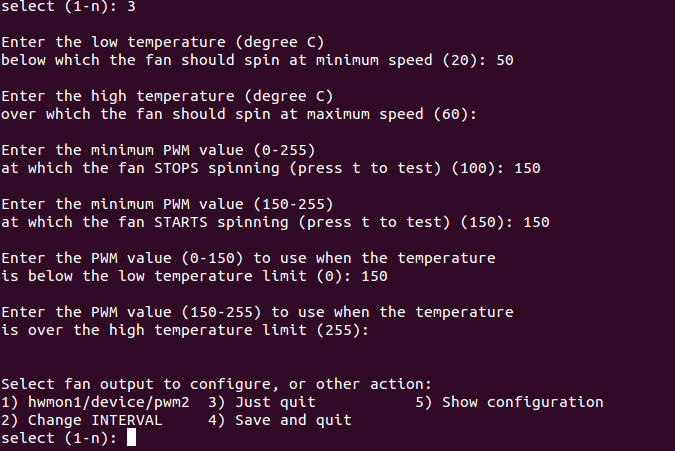 And then choose 4 to save the values.
Salvaging fancontrol
This is where things should be fine – running fancontrol now gives me errors:
Error: file hwmon1/device/pwm2 doesn't exist
Error: file hwmon1/device/fan4_input+hwmon1/device/fan1_input doesn't exist
Well, these do exist and they are correct, so this may be a configuration syntax issue.
sudo cp /etc/fancontrol /etc/fancontrol_orig
sudo vi /etc/fancontrol
This line looks a bit suspicious:
FCFANS= hwmon1/device/pwm2=hwmon1/device/fan5_input+hwmon1/device/fan4_input+hwmon1/device/fan1_input
It contains both of the errors reported, so let’s change it to:
FCFANS= hwmon1/device/pwm2=hwmon1/device/fan5_input
I don’t think it really matters that 1 or 3 fans is controlled by the same parameter, the action of the system to increase pwm2 when the temperature exceeds 50 degrees Celsius should be the same. Trying fancontrol again and it works!

Now all we need to do is make fancontrol get started when the system starts. Checking /etc/fancontrol, there is already a script for this, so should all be ok. Test by rebooting and in the middle of the ubuntu initialisation screen, the fans go quiet!
Let me know if you have any luck with this or if I’ve missed something. Here’s to a quieter future for all.
Update for Ubuntu 14.10
I upgraded to 14.10 today and this stopped working. When I typed fancontrol, I got:
Error: file hwmon1/device/pwm2 doesn't exist.
The solution that fixed this for me was to:
sudo mv /etc/fancontrol /etc/fancontrol_v2
Then repeat the steps above from pwmconfig onwards to generate a new /etc/fancontrol. Test that it’s ok using:
sudo fancontrol
Rebooting confirmed this was working during startup

Esteban
/ February 20, 2015This looks like this would really help me out. Im not to sure how to work out this step
This can be fixed by relaxing an acpi check in the kernel (hmm), see https://hydra.geht.net/tino/howto/linux/fixes/w83627hf/ amongst others for more details. The way I fixed this is to edit /etc/default/grub to add acpi_enforce_resources=lax to the GRUB_CMDLINE_LINUX_DEFAULT giving:
how do you relax an acpi check in the kernal?
mdhalien
/ February 20, 2015My windows motherboard software is asus epu-6 engine. You will need to check to see what came with your motherboard. First, find out what you have got.
For the kernel check, investigate grub and you will find it is what starts Linux. It sets the kernel options in the manner I describe in the next sentence, so you just need to do that.
aolney
/ June 1, 2015Worked great. Only change was to fix fancontrol. Originally it had this line
FCFANS= hwmon0/device/pwm1=
Which I changed to this manually
FCFANS= hwmon0/device/pwm1=hwmon0/device/fan1_input
AlbertCoder
/ July 26, 2015I really have so many expectations from this post. Great effort man! But I am facing some problem. I am stuck at Fan Configuration Setup. When I run “sudo pwmconfig” I get this error “/usr/sbin/pwmconfig: There are no pwm-capable sensor modules installed”. Please help I am unable to conquer my CPU fan.
mdhalien
/ July 26, 2015You need to follow the instructions in the Enable Fan Setup Configuration section above. Read the info at the link too. Of course you must have hardware that supports this. Your BIOS and motherboard documentation can help you there.
sp1etz
/ October 23, 2015Thank you! That helped alot. really good job! 🙂 🙂 🙂
Mihail Naydenov
/ November 16, 2015Thanks.
However this why Lunux/Ubuntu are not “there”.
Anjela
/ January 26, 2016sudo mv /etc/fancontrol /etc/fancontrol_v2 doesn’t work for me
mdhalien
/ January 26, 2016Hi Anjela, what error do you get? Does the /etc/fancontrol file exist?
Anthony Adverse
/ December 20, 2017Great piece of work. Just worked for me 🙂
Pasha
/ October 15, 2018The best!
Don’t forget to run “fancontrol” with “sudo”!
Oliver
/ March 11, 2021thank you so much – the fan was not loud but slowly tilted my nervs. now i’m ejoying the silence! the grub-fix was the gamechanger!