
Disk free, of course means no CDs / DVDs etc. were harmed as part of this install. Be a little bit greener / lazier and don’t get out the optical storage.
This article isn’t just about a change of architecture, it is intended to explore a way to manage releases of Ubuntu (and probably other Linux varieties too), even potentially a way to allow disparate distributions to share the same data. It is also intended to be a repository of Linux upgrading information for future reference.
I am still using my trusty Asus U36J – however the F11 key has become a bit dodgy and once fell out. A bit of coaxing got it back in place but it isn’t what it used to be (just in the interests of disclosure, you know). This is a single user home laptop system using the default Unity desktop.
Upgrade Strategy
What has emerged from attempting this procedure is that it is not clear what should be in a viable upgrade strategy for Linux. If you have existing package installations, configurations and data, there are numerous issues that need to be addressed:
- Do you upgrade in-place or to a new partition?
- When moving from 32 bit to 64 bit, you cannot do an in-place upgrade due to the architecture changes, so do you format the existing root partition and start from scratch or create a new partition and install there?
- Assuming the /home directory is on a separate partition, is it possible to share it between two versions of the Operating System (O/S)? If not, can /home be used as-is or does it also need upgrading some how?
- How do you cope with software configuration differences?
I wanted to play things safe and therefore needed to have the ability to return to 12.04 if 12.10 (64-bit) was not working. This proved to be a good idea as many difficulties came out of the woodwork and I would have been really stuck (or at least have had to revert to backups) if I had not had this.
Given that a mechanism for upgrading is not obvious and by that I mean that there is no upgrade process that automatically modifies all software to work with the new O/S, what is the simplest upgrade method suggesting itself from the constraints inherent in Linux? I have not attempted this but, at a high level, it might be something like:
- Do a one-way upgrade – don’t attempt to have two versions of the O/S simultaneously.
- If you have been sensible and kept all your data files (properly backed up of course) in your /home directory in a separate partition from the root directory, rename the /home directory (e.g. from /home/martin) to a backup place, say also on the /home partition. This could be done by something like sudo mv /home/martin /home/backup.
- Install the new O/S and use the existing /home partition. Recreate the user id, this will create a new /home directory.
- Copy all the files you want from the backup. Avoid configuration files (e.g. .ssh/*) unless you really know what you are doing.
- Reinstall and reconfigure all the software you want. There may be some extra issues with cloud services such as Ubuntu One and Dropbox that have their own directories.
Basically, very close to starting again. As this is not very flexible, I will be attempting a different approach, where the goal is to run two versions of Ubuntu simultaneously:
- Create a new partition and install Ubuntu 12.10 64 bit on it.
- Create a new user id with the same UID and GID as the existing user id on Ubuntu 12.04.
- At least partially solve the issue of different system configuration files. The difficulty is that the /home directory contains the user’s data files but also their configuration files. If you want one set of data files but allow for different configurations on two systems, having a shared single /home directory does not work (see the troubleshooting section at the end of this article). There needs to be two /home directories, one for each version of Linux. The install can be set up to mount the old /home in a separate area so that the data files can be accessed, in this case, we will use /shared.
- Another reason this is problematic is that Ubuntu assumes the user’s standard Documents, Downloads, Music, Pictures etc. directories are within the /home directory. To get around this it is possible to set up symbolic links to minimise the inconvenience in 12.10. Alternatively, ~.config/users-dirs.dir can be edited to alter the definitions of where these directories are held, but this is not recommended as it is not so obvious when navigating through the file structure directly or through the Nautilus file manager.
- The 12.04 /home partition will become a shared partition just for data and users must be careful to create documents there and not directly within their home directory.
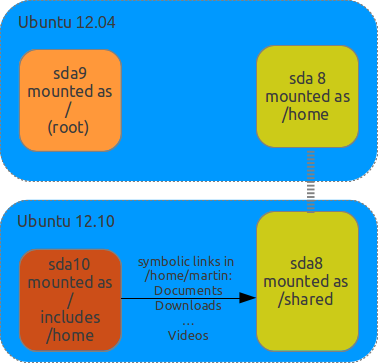 Here is a diagram of the structure of the partitions showing separate root directories but common files held under the /home directory. Note that users should create new data files within the /shared directory either directly, or by using the links from the /home directory. The partition naming (sda…) will be further explained in the coming sections.
What is this UID / GID Stuff Then?
 Let’s have a look, for that we can use the GUI user and groups application. To get use sudo apt-get install gnome-system-tools. Then you can run from the dash or command line using users-admin. The UID is a unique number for each user, which is actually the number the system uses to refer to the user rather than the name. This means it must be the same across systems when sharing files and can be seen in the User ID field on the right to be 1000.
The GID is the group equivalent; each user is also his/her own group and can again be found in the users-admin screens (manage groups button then properties). In my case, which is the normal situation for users, it is also 1000. This is the user id created on a new install, which means that the install here should use my name to get the id of 1000.
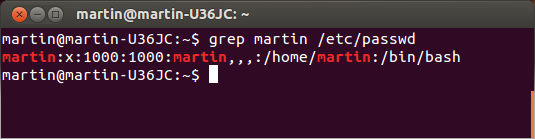
Another way to see these numbers is to do cat /etc/passwd | grep martin, or what the user id you are interested in is. The two numbers in the middle will be the UID and the GID:
 Now let’s get installing!
Making a new partition
We cannot do an in place install since this is changing from 32 bit to 64 bit, but also because we are trying to run two O/S versions in parallel. I am going to use the handy gparted utility (sudo apt-get install gparted if you don’t have it). Running it shows my partitions are getting a bit fragmented, and this is after a bit of tidying up. I have found during my previous experiments that I need quite a large root partition, much larger than is often advised, and I have eventually ended up at 18.62 GB in /dev/sda9:
 This is a dual boot Windows machine, the main partitions used are:
- /dev/sda2: the Windows C: drive for programs
- /dev/sda5: the Windows D: drive for data
- /dev/sda9: the Ubuntu 12.04 root partition
- /dev/sda8: the Ubuntu /home partition
I have decided to set up a completely new root partition for 64 bit Ubuntu 12.10 so I will need some space. Looking at the above screen shot, we can see that /dev/sda5 has nearly 150 GB spare so I can nab another 20 GB from that. This means that I will be able to have two Ubuntu root partitions and so will be able to alternate between new versions as they become available, to try them out.
We cannot grab empty space at the moment as the partition is locked due to being mounted (the little key icon above). That is easy to fix, right click the partition and select unmount, then click the green tick to apply. This should remove the key icon. Now right click, select resize and use the GUI via cursor dragging or by entering numbers to have 20,000 MB free space following the /dev/sda5 partition (this means that partition will be made smaller). Then click Resize/Move.
This queues the action so right click the new unallocated partition and select New, change the File System to Ext4 and click Add. Now click on the green tick and confirm to apply. Now we end up with a modified view of the partitions:
 There is a new /dev/sda10 ext4 partition with a size of 19.39 GB for the new O/S to go into. Note that I probably rebooted as /home is locked again. I also did a little tidying up as the unallocated space between /sda5 and /sda9 has been absorbed into /sda10.
Getting Ubuntu 12.10 64 bit version
Go to http://www.ubuntu.com/download/desktop and select the 64 bit version:
 Select the option to save it, and put it in a local folder within the /home partition – I just use the default Download directory:

Set up the Installation from an ISO image
The most common way of installing is to burn the downloaded ISO image to a CD or DVD and then boot from that, but this is a pain and wasteful. I prefer to just boot from the ISO image directly. To do this we need to do a bit of system file editing. Given that I am already using Ubuntu 12.04, I am also using the Grub2 bootloader and can use the method here to set up a new boot option.
This is taken from Grub2/ISOBoot Ubuntu documentation. Use your favourite editor to edit /etc/grub.d/40_custom. In my case this is vi, so I can enter:
sudo vi /etc/grub.d/40_custom
Then add the following lines to the end of the file and save:
menuentry "Ubuntu 12.10 64 bit Desktop ISO" {
    set isofile="/martin/Downloads/ubuntu-12.10-desktop-amd64.iso"
    loopback loop (hd0,8)$isofile
    linux (loop)/casper/vmlinuz boot=casper iso-scan/filename=$isofile noeject noprompt toram --
    initrd (loop)/casper/initrd.lz
}
The file name that occurs in the above example reflects the download location on my computer so would need changing for a different set up (unless you are also called Martin and have an identical set up). Don’t worry about the amd in the ISO image name, it’s an anachronism, the file is also suitable for the Intel processor.
Very importantly, the (hdX,Y) is a way to tell grub2 which partition the file is found on, in our case this is on the /home partition which we can see from above is on /dev/sda8. There is no other disc than sda so X=0 and Y must be 8 giving (hd0,8).
Super very importantly, the mount point (/home) is now implicit in the (hd0,8) and therefore must not be in the pathname. The absolute directory /martin works fine. The “toram” option (scroll to the right) is also needed otherwise the install won’t work.
Now must refresh the grub2 bootloader configuration by:
sudo update-grub
This gives output with no mention of the new option, so don’t worry that it’s missing.
Firing up the ISO image
Now restart the computer to go to the grub2 menu. At this point, there should be a new option at the bottom of the O/S list saying:
Ubuntu 12.10 64 bit Desktop ISO
So choose that and it should act just like a live disk and boot to a new desktop.
If is possible to get the following error:
error: file not found.

error: no such disk.

error: you need to load the kernel first
You can find troubleshooting help in the Grub2/Ubuntu link above. It will most likely be a typo or misunderstanding of the way the directories are accessed – this gives you an opportunity to grubble about using grub commands! You can use the “c” command from the grub2 menu to get to a command line and type things like ls (hd0,8) to see what grub2 is actually looking at. ls shows all available disks using a slightly different naming scheme with “msdos” as part of the numbers.
Installing from the ISO
Once we have successfully booted using the ISO image, we have to clear out the /isodevice mounting otherwise the installation hangs. In a terminal window use df to look at devices and:
sudo umount -l -r -f /isodevice
Here is what the mounted partitions can look like before and after:
 Instructions are given in the Ubuntu Documentation for how to do a standard install (start by clicking on the Install Ubuntu 12.10 icon on the desktop). The installer can ask if you would like to unmount an in use /dev/sda:
 This means that you didn’t do the previous step, so go back and do it! Best to exit the installer and start again.
There will be a prompt about the installation type, choose “Something Else”:
 The next dialog box will show a list of all the partitions. We need to add the root and /home mount points so select New Partition Table:
 For root, we need to use the partition created earlier, in my case /dev/sda10. Select it and click on the Change button above to get:
 This little dialog box has a Use as drop down list, select Ext4 journaling file system. This will open up a Mount point drop down list, where you should select “/” for where the root directory (i.e. the Operating System files) will be installed. If you are doing this multiple times (like I had to while exploring the available options) it’s nice to format the partition so you know you are starting from scratch. Click OK, then back to the installation type screen. Don’t touch anything else and click Install Now and proceed as per a normal install.
We also need to set /dev/sda8 (in my case) as a shared directory so that it is available for both versions of Ubuntu. It is set to the /home directory in 12.04, but we want to let the install create a new /home to get a new set of configuration files. We can get a partition to mount anywhere we like by typing in a location rather than selecting. In this case we can type in /shared:
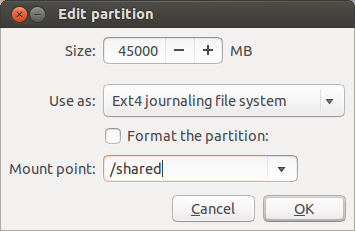 So, choose Change again, select the same Use as value but choose /shared for the mount point. ABSOLUTELY DO NOT FORMAT IT! I knew you wouldn’t, I’m just mentioning it.
Carry on through the normal update procedure. In a home computing environment, I like to log on automatically and so when I get to the Who are you? screen, I need to check that option:
 Once installation has finished reboot and select Ubuntu from the first line of the grub2 boot menu.
Post Install Checking, Upgrading & Partition Configuration
![]() As long as things have gone ok, you should be in Ubuntu 12.10. Now the configuration work starts. Let’s first update the software packages that are clamouring for it. Use the icon on the left to start the process.
As long as things have gone ok, you should be in Ubuntu 12.10. Now the configuration work starts. Let’s first update the software packages that are clamouring for it. Use the icon on the left to start the process.
What has happened with regards to the U36J? Is it using unity 3d by default? See Linux on U36J: Moving Unity from 2d to 3d (and Doubling the Battery Life!) for more details. When we inspect the contents of the DESKTOP_SESSION environment variable, it is set to “ubuntu” showing that 3d is enabled by default. Windows have larger grab areas. Very nice.
Interestingly, if you are like me and fancied trying out some of the things from that previous article, DON’T install the nvidia-current drivers as it caused me to lose the unity desktop and I had to remove the drivers to get it back. If anyone knows how to get glxspheres, I’d be happy to receive the info!
So what about the old /home partition from 12.04? Lets do a df and take a look:
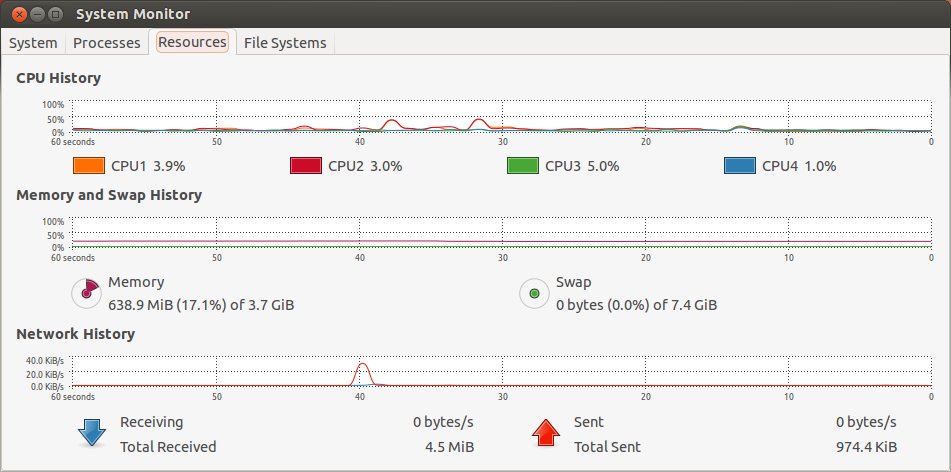
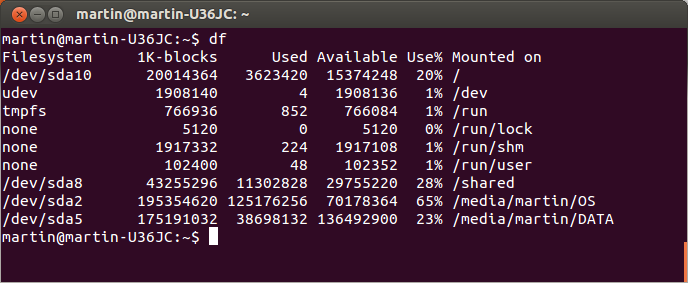 We can see that it has successfully been mounted at /shared. We can also see sda10 at root position and a couple of other partitions mounted too (sda2 the Windows C: drive and sda5 the windows D: drive). Looking at the system monitor, the swap space is also found and things look pretty calm:
 Let’s try linking the Documents folder to the one on the shared drive using the ln -s command:
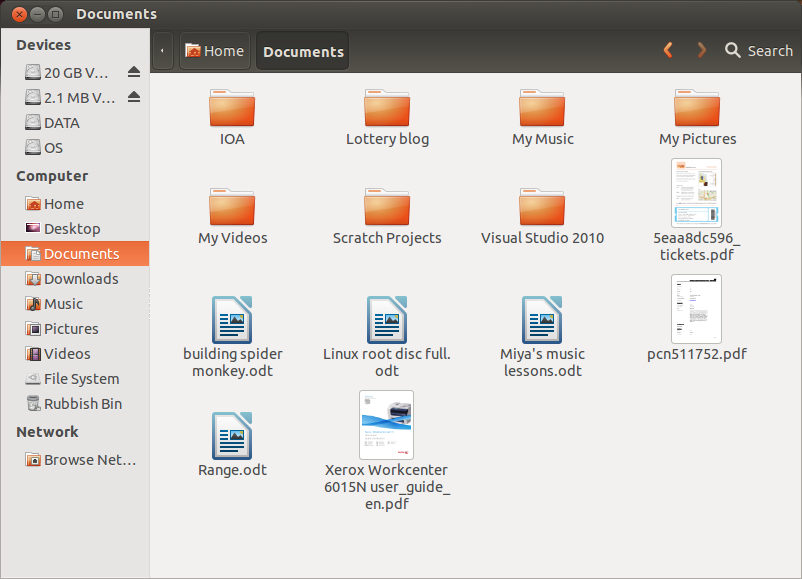
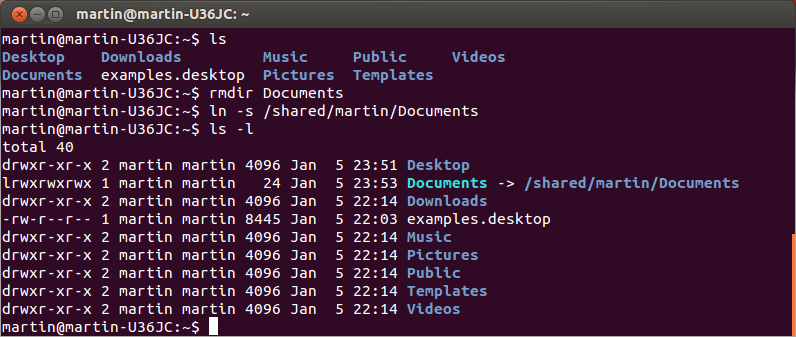 Here we can see the creation of a soft link as a replacement. But does it work? Lets see what’s inside it using the Nautilus file explorer:
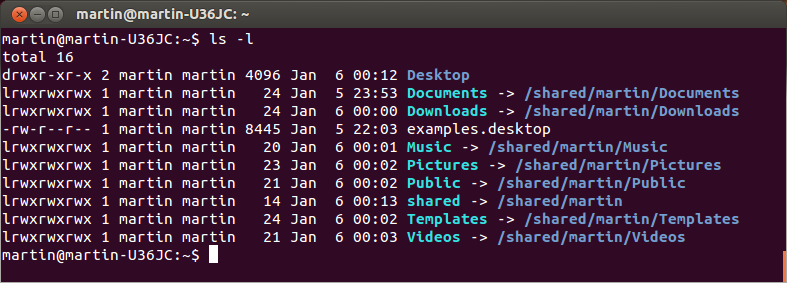
 So that’s great – let’s do the rest except for Desktop, and also add in ln -s /shared/martin shared to give a master link to the base directory:
 Now all sorts of things work including the file select dialog to choose images from the shared Pictures directory.
Adding Packages
In the search for a reasonable way to grab packages from the old system, I tried a few things from the net that didn’t work. However I also found the Ubuntu Software Center (USC) – click on the left hand panel’s shopping bag icon to activate. You need to create a user id and sign in from both the old O/S and the new in order for USC to detect what packages have been installed on each. Then you can use the File -> Sync Between Computers option to get a list of packages that need to be added to the new computer:
 Here we can see that both of the computers (i.e. O/S versions) have the same computer name – they are distinguished by which one says “This computer”, so we need to be working in the new O/S at this point, as this is where we want to install to.
This is a bit of a manual task, and so it should be, since we don’t install something that will trash the new system. It’s probably best to err on the side of caution and only install things you know you need – this also gives an opportunity to clean up those packages that you installed and never used. Remember, don’t do the nvidia drivers! I’m not sure why there are three copies of the Banshee Media Player, but I only need one (at most). So go through and install those packages.
Each time you click install, a number is added to the In Progress meter (after a little delay) so you can verify the installation has been queued. After a few additions, it goes away to think, so you have to come back later. You can use this time to do something useful like facebook, writing an article on upgrading Ubuntu etc.
There are various packages that I thought might be a bit of a problem so I left them out for the time being. These include Ubuntu One and Dropbox (as shared folders are already being sync’d by Dropbox on the older O/S).
After they have been installed, each package appears as an icon in the launcher and to avoid clutter, it’s probably best to right click and select Unlock from Launcher.
Configuration files
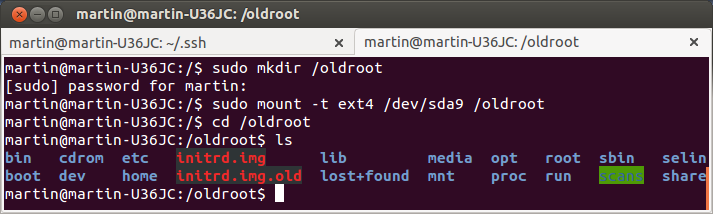
You may have particular config files like amendments to .bashrc and things in /etc that you want to keep. I suggest that you merge these manually – you can use meld which is a nifty tool to help you visually compare the differences between two files and select which changes to move between versions. To get at /etc files, you need to be able to access the files from the old O/S. This is easy to do, you just mount the drive:
sudo mount -t ext4 /dev/sda9 /oldroot
 Then meld can be used to compare both versions of a file and you can use the arrows indicating differences to move them between files:
 I was also easily able to get my previous ssh configuration to work, just by linking the .ssh directory in the same manner as we did with the other directories in /home:

Using fstab to mount a drive at boot time
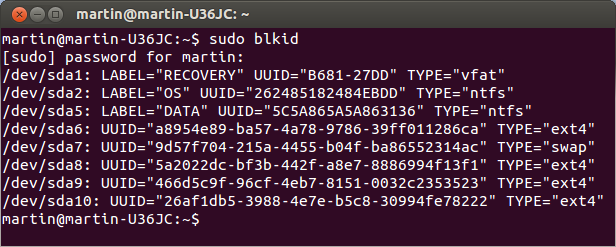
In order to keep all related information here for future reference, here are some instructions on how to permanently mount a drive. Each partition has a globally unique identifier called the UUID (Universal is more general than Global, but I don’t think it really makes much practical difference).
First we need to find the UUID for the drive we are interested in (/dev/sda9). This can be achieved by the blkid command:
 Now we have the file, we have to create a new entry in /etc/fstab also containing where we want the file to be mounted:
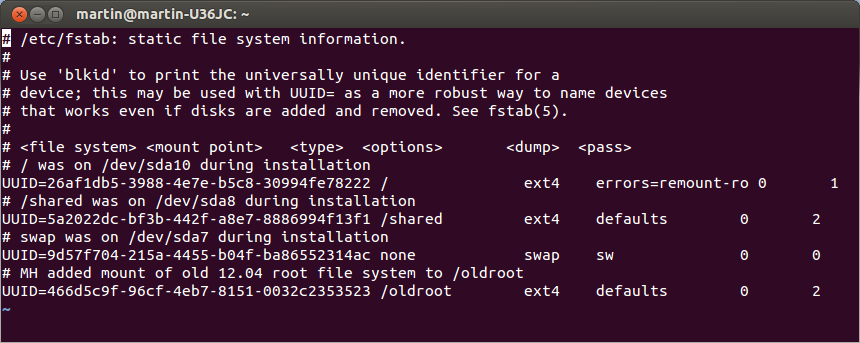 Most columns are largely self explanatory, man fstab has more:
- File system: UUID = value from blkid for the partition
- Mount point: empty directory where to mount the drive in the file system
- Type: type of file system, here ext4
- options: the value default allows read/write access, the ability to execute files, the normal sort of stuff.
- Dump: 0 to not back up the file system
- Pass: 2 to make fsck check the drive after the real root partition.
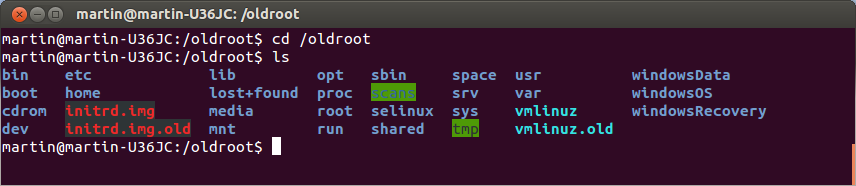
Then restart the computer. You can check that the drive is there using ls:
 Conclusion
This has become quite a long article and I didn’t even go into too much detail about some stuff. What I was trying to show was a way that multiple releases can be installed and used simultaneously while preserving the data on the same machine in a separate partition.
There are still more things to do, such as installing printers and scanners, but by now I have a good feeling about 12.10 and can already see some benefits, so I have already mentally moved over and will be using it as my primary O/S.
The bi-annual Ubuntu release cycle necessitates a structured approach to upgrading but I can see why some advocate using the less frequent Long Term Support (LTS) releases only. For others, who want to see what is new and great in Ubuntuland, and to also get benefits from the latest kernels, it can be worth the effort. In the case of this Asus U36J laptop, it is appreciated that Unity 3D now just works, but it makes me wonder if the Optimus card is being used? Well that’s an investigation for another day.
What do you think? Is this a good way to manage releases? Is there some blindingly obvious thing I’ve missed? Are there better ways? Please leave a comment and let me know.
Troubleshooting Hints
- If Something catastrophic happens to you, like losing power during an install (no I did something more stupid than that), you can end up with an unbootable system where you get a “grub rescue>” prompt only (see recovering-from-grub-rescue-crash). A way to get out of that is to use an Ubuntu live CD (like we didn’t create for this article!), but I have for 12.04. Then install and use boot-repair. This worked beautifully and the system was able to come up nicely again.
- After a new Ubuntu 12.10 install has set up grub2, it removes the ISO option from the boot menu as this is generated from the 12.04 /etc/grub.d/40_custom file. If needed, it must be added to 12.10 in the same manner as for 12.04.
- You can get problems logging in from the initial lightdm login screen. The problem is most likely due to a login failure from inheriting incompatible configs. This can be fixed by installing a new /home directory and linking as in this article. Possibly also can be obtained if the UID/GIDs are wrong.
- If you need to be able to set junky simple passwords, use sudo passwd <user> and the normal rules of password complexity are avoided! Of course, use at your own risk, may the nasty goblins open a fissure under the earth and eat you up, you know the drill.
